During a regular year in craft show season, our watercolor maps are often the star of the show. We put them in barn wood frames for a beautiful display and we have sold out of these frames in a day more than once.
Every year, I add a few maps to our collection. Some years, more are added than others. My busiest year I created a total of 13 maps! We have 54 maps available on our website-from the Boston Marathon, to a few states, to picturesque towns and vacation spots like the Cape.

This is a Cape Cod map used as a wedding sign in board. Thank you Melissa Mullen for the photo.
The map process has really evolved over time. Initially, I would create a map for each town where we were doing a craft show. Nowadays we are so busy with other aspects of business, that we have had to make some changes about which maps make sense for us to create anew. This blog post will explain how the El's Cards maps are created by hand.
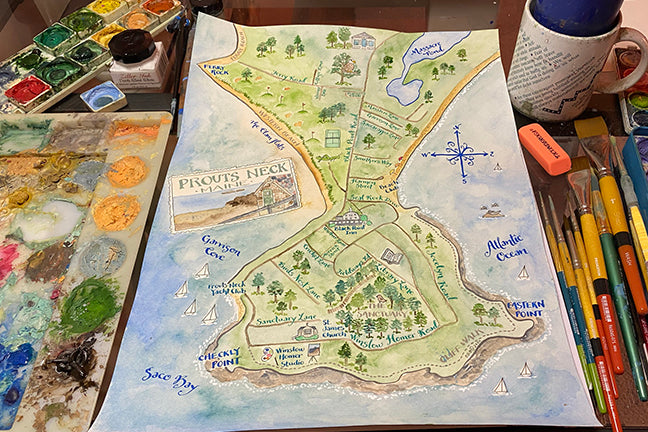
One of the very first maps I created was in 2010 for a little shop called The Carry All (no longer there) in Prouts Neck, Maine. This week, that Prouts Neck map was redone for our holiday map special. I have really learned a lot about making maps since the early map making days. There are many steps that go into making a good map.
Step 1-Research-This is critical to getting started. I like to find out about the area I am going to be mapping and the places that are important to the locals. It is also fun to learn about the history of the place. This is the stage where I look for photos that will help me with the illustrations and different maps of the place on several search engines. Bob often helps me with the research part of making the maps. For this map, I had help from one of my brides and also from a card client. It's really the best when there is someone willing to help and answer questions and I had great assistance getting this map ready. A great big thank you to my Prouts Neck friends!!
Step 2-Pencil layout and detailed drawings-This is where things really start coming together. I set up the general area and then start adding in streets and places of interest. Sometimes the area for the map is not a clear vertical or horizontal orientation. It's important to get the layout done in such a way that all the fun details can be added. Sometimes a few liberties must be taken for the sake of fitting the artwork. But remembering, this is art and it has a whimsical feel to it. So the shape is always correct, but it may be a little stretched this way or that to make it work as map artwork. This was the case with the New Hampshire map below.

Step 3-Calligraphy and Ink-Before beginning this step, I go through my bottles of ink to decide what colors I wish to use for what elements. So I might select green for street names, blue for anything on water (bays, coves, oceans, ponds, etc.), and aqua for special places. Then I do the names of places, streets, etc. in calligraphy. The ink used is one that I can paint right over and it won't run when it's time for that step. Each color needs to fully dry before the next color is begun....I have put the side of my hand in wet ink more times than I can count because of my impatience! Actually, it happened today!
Step 4-Watercolor Paints-This step is my favorite! I mix any special colors that I don't have on my palette and and start painting. Typically the smaller designs are painted first, and then land and water are last. Sometimes I have an idea to add more drawings somewhere, and if the large areas are already painted, this won't always work out.

As you can see, I work messy! Paints, inks, brushes, multiple palettes....
Step 5-Scan and Clean-After the map is painted, it is scanned on my Epson scanner in pieces. The scanner is high quality, but not large enough to scan the full map. The map is created in 11" x 14" size, so I scan it in 4 pieces. After putting it together into one image, I go through it and clean up any smudges of ink, weird edges, etc. Anything that would stand out as a defect. After that, Bob looks it over too because two pairs of eyes are better than one. He often notices little things that were missed in the initial review.
Step 6-Size for printing-The final step is so important! Bob prints all of our paper goods right here in house. After the map is finalized, I size it for all the different print size options and the map notes too. We keep in mind that people will be framing the maps so we typically leave a small border around the edge that will work well with most frames.
As you can see, designing a map is quite a detailed process. This Prouts Neck map took me a full week (5 work days) to complete. People often have map requests, and we have had to limit the number of these projects that we take on because of the time involved.
Also worth noting...the El's Cards maps are created completely by hand. All the steps are done on a piece of Arches paper using bottled inks and tubes of paint. I mix my own colors, hand letter, and hand paint each and every map! We love seeing the map collection grow and the enthusiasm people show when they find out we have their special place.
The maps are a great gift and a fun way to decorate a special area in your home. Try a grouping like these creative people did below!


We hope you find a map that you like! Thank you so much for reading our blog and learning a little more about how our map artwork is created. Happy Shopping!
xoxo
El